|
Now that you have mastered the basics of RF communications you are ready for a project!
In this project we will connect a temperature and humidity sensor to the Flex RF module so you are able to wirelessly transmit temperature and humidity readings to a base station (also see here for how to configure another Flex module as base station).
You will configure this device a wireless sensor node. Read more about that here or in the wireless sensor manual.
 What you will need:
- Breadboard, or if you need a more compact solution the mini breadboard can also be used.
- 3.3V step-up power converter. The reason we need a step up power supply is for the DHT22 sensor which has a minimum voltage of 3.3V and maximum of 6V. The Flex requires 2V to 3.3V. Two AA batteries provide up to 3V and will supply less and less as the power supply gets used. We could use 3 x AA batteries (4.5V) but then you would need a step-down power module to convert 4.5V to 3.3V for the Flex module.
- Some jumper wires
Construction:
If you have not used a breadboard before, it allows you to connect electronic components together without using solder or a PCB. Inside the breadboard some of the point are connected (a-e are connected, f-j are connected and the power rails "+" and "-" on either side are connected).
Press the Flex module onto the breadboard as shown in the wiring diagram. Depending on the quality of the breadboard the module could go in easy or may require some wiggling and pressure to get all 20 pins seated on the breadboard. Be careful removing the RF module from the breadboard that you don't bend any of the pins. Use a firm grip and gently wiggle the sensor back and forth to get it off the breadboard.

Figure 1 - Wireless temperature and humidity DHT22 sensor Wiring diagram
Place the power pod on the sensor and take note of the pin labels. Some power modules may have different labeling than the ones used in the wiring diagram.
Make all the other connections as shown in the wiring diagram. Refer to the FLEX pin-out diagram if required.
You are now ready to connect your sensor to the base station. If you have not set up a base station before then refer to the preceding tutorials to his one.
Software
pi@raspberrypi:~/pi $ python serial_mon.py 9600
To exit press ESC
Sun Mar 4 19:08:04 2018 a01HELLO----
Sun Mar 4 19:08:10 2018 a03STARTED--
Sun Mar 4 19:08:10 2018 a03STARTED--
Sun Mar 4 19:08:10 2018 a03STARTED--
Sun Mar 4 19:08:10 2018 a03STARTED--
Sun Mar 4 19:08:10 2018 a03STARTED--
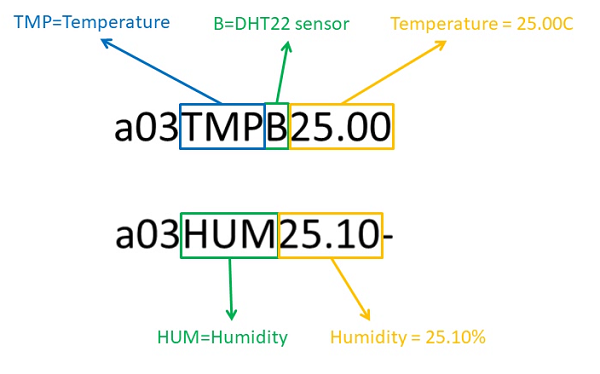
pi@raspberrypi:~/pi $ python rf_config.py 03 TEMPBsending : a03TEMPBresponse is : a03TMPB25.00a03HUM25.10-The response is two 12 character messages one after the other. Here is a diagram illustrating the various parts of the messages:
Configure the sensor to only send 1 set of readings every interval:
pi@raspberrypi:~/pi $ python rf_config.py 03 NOMSG1sending : a03NOMSG1response is : a03NOMSG1---Configure the sensor to send aw reading ecery 5 minutes (make sure you use "005" and not "1"):
pi@raspberrypi:~/pi $ python rf_config.py 03 INTVL005sending : a03INTVL005response is : a03INTVL005-Configure the sensor as Type 3. Type 3 sensors will send readings from the DHT22 sensor. Refer Sensor Types in the wireless sensor manual for more information.
pi@raspberrypi:~/pi $ python rf_config.py 03 TYPE3sending : a03TYPE3response is : a03TYPE3----Puth the device into a cyclic sleep
pi@raspberrypi:~/pi $ python rf_config.py 03 CYCLEsending : a03CYCLEresponse is : a03CYCLE----Watch the video of this tutorial here (maximize screen so you can read the text):
|
 |
Home > Home Alarm System project > Wireless Projects > Wireless Sensor - FLEX RF Module > Flex Tutorials >