Flood/Water Presence Sensor


In this tutorial I will show you how to build a flood or water presence sensor and connect it to your PrivateEyePi alarm system to either trigger the alarm or send you email alerts. This is useful for installing in areas of your house where you are worried about a water leak that could cause expensive damages. 

How it works

This sensor has strips of metal plated probes that when in the presence of liquids change the resistance that will activate the internal switch. It can be mounted for example on a skirting board, with Raspberry Pi some height above, via the attached wire. When the liquids drain away from the probe the resistance will drop and the switch contacts will open again. Liquids of very poor viscosity may not drain away from the probes and will cause the switch contacts to remain closed.

What you will need

Water sensor wires to a Raspberry Pi
  • Water sensor
  • Breadboard, or PCB and solder, and jumper wire 
  • Raspberry Pi and all associated peripherals (network, power, keyboard, mouse etc..) We do not sell the Raspberry Pi.
  • 1 x 10k ohm resistor
  • 1 x 1k ohm resistor
Construction

Water Sensor Wired to Raspberry Pi

  • The 1k resistor creates the least resistance so pulls Pin 15 high. When the sensor is in presence of water it creates a short circuit to ground and Pin 15 will go into low state.
  • Build the circuit as depicted in Figure 1.
  • Figure 2 shows the pin layout of the Raspberry Pi header
  • I have chosen to use GPIO 22 but you can connect that to any available GPIO digital pin on the Raspberry Pi
  • I would recommend making the wires to the water sensor quite long so you can install the sensor on the floor or close to where you want to detect for water, but keep the Raspberry Pi up and away from the water.
  • Once built follow the alarm system tutorial to configure and set up your alarm system (if you haven't done that already). 
  • The sensor will now operate like a door switch and trigger the alarm when open and reset when closed. That doesn't make much sense for a water sensor. The solution to this problem is to construct rules specially for the water sensor. We currently have a Beta release of our software that allow you to do just that.  See the Using Trigger Based Rules section below to configure rules to create alerts, sirens or alarms.


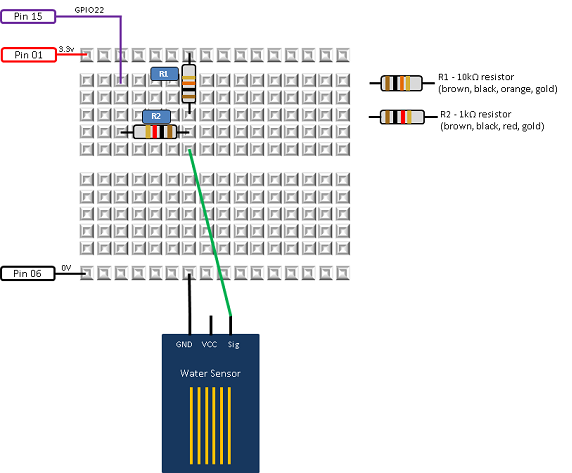
Figure 1 - Water sensor wired to the Raspberry Pi


Figure 2 - The GPIO header of the Raspberry Pi


Using Trigger Based Rules
  • Follow this tutorial to install the rules based software on your Raspberry Pi
  • Now you can define rules specifically for the water sensor. For example you may want the water sensor to trigger your alarm, see figure - 5. Or you may want it to send you and email or sound the siren (or all of these options). You can define as many rules as you want.


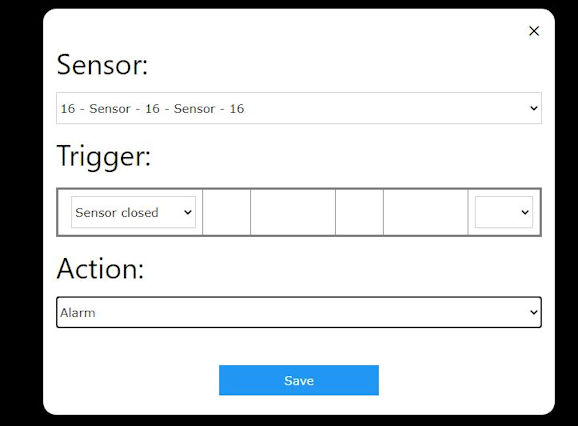
Figure 5 - Define rule based triggers
  • Make sure you configure the rule to say "if sensor closed" (as per Figure 5) not "if sensor open" like you would do for a door switch.
  • You can view your dashboard at www.privateeyepi.com/rules/beta
  • If you have switched on "Display sensor status on dashboard" (under settings, config) you will see sensor status' as per Figure 6. Notice that the Water Sensor Basement is showing a red signal. This is because the sensor is normally open. It will go green when the sensor is in the presence of water. We know this is counter intuitive, so we will include a fix for that in a future release.

Figure 6 - Sensor and status on the dashboard (battery indicators given for wireless sensors)

  • Test your sensor by submerging the sensor in water. 


https://www.jemrf.com/collections/accessories/products/moisture-detection-sensor-module-for-soil-or-water-for-arduino-raspberry-pi

https://www.jemrf.com/collections/rf-sensors/products/wireless-water-sensor

https://www.jemrf.com/collections/rf-sensors/products/wireless-base-station-for-raspberry-pi