|
Project Description
In this project I will show you how to switch a circuit on and off using an internet browser, RaspberryPi minicomputer and a relay switch.
Warning:
Use extreme caution working with high voltages. This project will work for switching both DC and AC current. Using it to switch low voltage DC current is safe, however if you need to hack into a high voltage appliance please exercise extreme caution and preferably consult a professional to make the high voltage connections.
How it works
You will install a web server on your Raspberry Pi that will run a Javascript application to send On/Off messages to a message broker (MQTT). Then a Python program will receive the On/Off messages and switch the Raspberry Pi GPIO on/off, which switches the relay on/off. See figure 1 below that show you how the Raspberry Pi is connected to the relay switch.
What you need
• Raspberry Pi, SD card with Raspbian OS, network connectivity to the internet
• Preferably run the Raspberry Pi headless and use Putty to log into the Rpi and FileZilla to copy files to the Rpi. This way you can put the Raspberry Pi close to the appliance you want to switch. Alternatively run two long wires from the appliance to the Raspberry Pi.
• You do not need any programming experience, we will provide all the code
• You do not need a PrivateEyePI account, as this project runs everything off the Pi and is not dependent on our PrivateEyePi server
• Basic soldering skills to build the relay circuit
• We recommend you use this relay switch, however you can build your own relay and source your own parts.
Build instructions
1. There are two separate circuits depicted in figure 2. The first circuit is the power and on/off signal to the relay switch (shown by PWR, IN and GND bottom right of figure 2). This circuit provides power to the relay coil and a signal (IN) that switches the coil on/off. The second circuit is the circuit that powers the lamp. By making a break in the GND (-VE) and attaching the two ends to the relay you allow the current to flow through the relay when it is open and a break in the circuit when it is closed.
Warning:
I would highly recommend first building a low voltage LED circuit to switch on and off. If you do hack into a high voltage appliance then exercise extreme caution. If you do not have high voltage experience and qualification then consult an electrician to do this part of the project for you.
If you have built your own relay switch make sure that the power rating of the relay input (IN) allows for 3V and the power of the coil is 3-5V and importantly does not exceed the maximum 1 Amp current rating.
8d7b.jpg?attredirects=0)
Figure 1 - Circuit diagram for a relay switch controlled by a Raspberry Pi
*
* The diagram shows the relay wired to the 3V Raspberry Pi Pin. Some relays require 5V (which is pin 2).
2. Lastly test the relay by building a simple Python program. If you have never written a Python program that uses the GPIO ports then follow these instructions on how to install the GPIO library for Python.
Navigate to the Raspberry Pi command prompt and enter the following commands:
Then type the following lines into the editor:
Press CTRL-x y ENTER to save and exit
Run the program by typing:
The light should go on. If you want to switch the light off then change the following line in the program:
GPIO.output(12,1)
to
GPIO.output(12,0)
SoftwareNow that your relay switch is working you can move on to the software section of the project where you will install the necessary software required to control the GPIO pins from a web application. We've written a simple web application for you that you can download an modify if you want. We will work out of the /home directory but you can choose a different directly if you want.
Tip: It's easier to install and run this software using the root user. It is possible to do it with the "pi" user but you will run into permission problems which makes this install complex. If you haven't used the root user before you can easily create it using the following command:
sudo passwd root
It will prompt you for a password. Reboot and login using the root user.
Step 1 - Install all the supporting software
Navigate to the command prompt of your Rpi and type the following commands:
Tip: Its easier to copy and paste these commands into a putty session window than to type them in. You can paste into a putty session window by clicking the right button on the mouse.
Compile MQTT Mosquitto for web sockets
The message broker we are using is called Mosquito and in order to be able to send messages from a web browser we need to re-compile Mosquito to include Websockets. This is done as follows:
cd /home/pi (or whatever directory you want to work from
At the time of writing this tutorial 1.4.2 was the latest version of Mosquitto. You can check for the latest version by going to the following URL:
http://mosquitto.org/files/source/Now download the source as follows:
Page down a few pages until you see WITH_WEBSOCKETS os shown in Figure 2  Figure 2 : Configure the make file to include Websockets
Change the line to say: WITH_WEBSOCKETS:=yes
Then press ctrl-x followed by "y" and ENTER to save.
Now compile the code as follows:
Configure the port and Websockets listener by entering these three lines at the top of the file as shown in Figure 3.
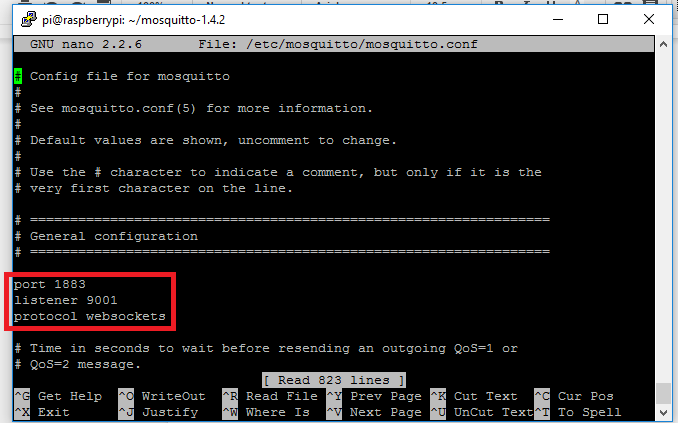 Figure 3 - Configure Websocket listener
Now you are ready to run mosquitto:
If all went well then you should see the following lines shown in Figure 4:
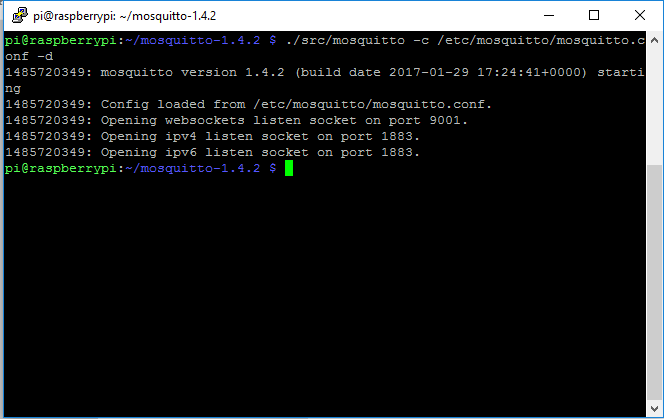
Our newly compiled Mosquitto server is now running as a background service. You can see it by typing:
ps ax
Installing web server
Earlier you stalled the Apache web server as part of all the software you loaded at the beginning of this tutorial. Now you will copy the HTML files into the web server home directory.
Download the software from our website as follows:
cd /home/pimkdir onoffcd onoffsudo wget www.privateeyepi.com/downloads/onoff.zipsudo unzip onoff.zip -d /var/www/htmlsudo mv /var/www/html/onoff.py ./
Now configure the website to point towards your Raspberry Pi IP Address. If you do not know the IP Address of your Raspberry PI type:
Near the bottom you will see the ip address as shown below (192.168.2.19 in my case):
Now edit the website config file with this address:
sudo nano /var/www/html/config.jsChange the host ip address to your address (I've configured my address of 192.168.2.19):
host = '192.168.2.19'; // hostname or IP address
Then press ctrl-x followed by "y" and ENTER to save.
Edit onoff.py to configure the GPIO pin you are using. It is set to pin number 7 by default, but if you are pin number 12 then change the 7's to 12 as shown here:
sudo nano onoff.py
....
def on():
GPIO.setup(
12
, GPIO.OUT)
GPIO.output
(12
, 1)
def off():
GPIO.setup(
12
, GPIO.IN)
....
Press ctrl-X followed by y to save and exit.
Now run the Python application that will switch the GPIO on/Off:
sudo nohup python /home/pi/onoff/onoff.py &
The application will run in the background on your Raspberry Pi so you can log off and it continues to run.
You can also run onoff.py from the command line and not as a background service. This way you can see on/off messages being printed to the screen like this:
pi@raspberrypi:~/onoff $ python /home/pi/onoff/onoff.py
1511783114: New connection from 127.0.0.1 on port 1883.
1511783114: New client connected from 127.0.0.1 as 84959f71-37b1-4749-877d-7616a0d36a40 (c1, k60).
Off
On
On
On
Off
Off
Off
On
Off
On
Off
On
Off
That's all. Now you are ready to test it. Open up a browser on any computer or device on your network and type in the IP Address of your raspberry Pi. This will bring up the ON/OFF web page. When you click on ON the relay will switch on and when you click OFF the relay will switch off.
I hope you have enjoyed this project. If you are in need of help feel free to join our support forum:
|
See also:
 |
Home >