Project DescriptionIn this project I will show you how to arm/disarm an alarm zone using a tactile switch connected to your Raspberry Pi.ElectronicsBuild a circuit according to the breadboard schematic in Figure 1.
%20(2).jpg) Figure 1 - Breadboard schematic for two switches to arm/disarm the alarm
SoftwareEdit the globals.py file by typing the following command at the command prompt:
cd /home
sudo nano globals.py
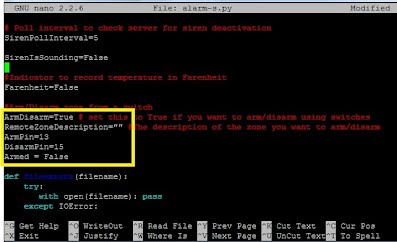
Configure the arm/disarm variables as per figure 3:
Figure 3 - Arm/Disarm configurations
Set ArmDisarm=True
Set RemoteZoneDescription equal to the description that you configured for the zone you wish to arm/disarm. If you have spaces in the description replace them with %20 (e.g. "My%20House")
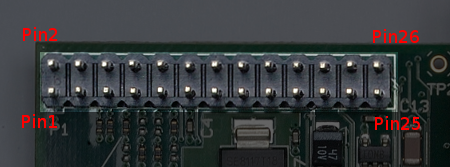
Set ArmPin equal to the pin number (refer Figure 4) to which the the arm button is attached
Set DisarmPin equal to the pin number (refer Figure 4) to which the disarm button is attached
Figure 4 - GPIO Pin Numbers
Lastly look for the PrintToScreen variable near the top of alarm.py and change it to True. This will allow you to test your switches and watch the program send arm/disarm messages to the server as you press the buttons.
PrintToScreen=True
Save the file by typing:
Ctrl-x y ENTER
Run the program from the command line:
sudo python alarm.py
Now press the arm button. A message similar to the following will be sent to the server:
Host Update: https://www.privateeyepi.com/alarmhost.php?u=YourUser&p=YourPassword&function=18&opcode0=YourZone
Now go to your dashboard at www.privateeyepi.com and verify that the zone is armed.
Next press the disarm button. You should see a message similar to the following:
Host Update: https://www.privateeyepi.com/alarmhost.php?u=YourUser&p=YourPassword&function=19&opcode0=YourZone
Now refresh the screen of the dashboard and the zone should be disarmed.
If everything went to plan you are ready to put alarm.py back into production. Edit the program as you did before using NANO and set the PrintToScreen variable to false. Press Ctrl-x y ENTER to save. If you are using the automated alarm system from this tutorial then reboot your Raspberry Pi by typing sudo reboot, otherwise run the alarm from the command line as before.
I hope you have enjoyed this project. Please support us either through donations or purchasing parts from our online store.
Many thanks.
|
Home > Home Alarm System project >

344e.jpg?height=378&width=400)

