Home‎ > ‎Home Alarm System project‎ > ‎

Temperature and Humidity using the DHT22 sensor


In this tutorial you will use a Raspberry Pi and a DHT22 sensor to to have temperature and humidty displayed on your PrivateEyePi dashboard.


 Multiple Sensors


 Display a temperature and humidity history graph


What you need:
  • Any Raspberry Pi
  • the following parts are available through the JemRF Store
    • DHT22 sensor(s) (DHT22) , one per temperature reading you want on the dashboard
    • 10k resistor (one per sensor) 
    • Jumper wire cables and breadboard or wire, soldering iron and solder (JW01, BB01)
 
For support, queries or suggestions please visit our support forum.
 
 
Step 1: Build and test the Electronics:

Parts can be purchased from our store: JemRF.com
  • Per Figure 1 put the resistor between pins 1 and 2 as in the diagram
  • Connect Pin 1 of the sensor to 5V GPIO (Pin 2)
  • Connect Pin 2 of the sensor to and free GPIO pin e.g. GPIO4 (Pin 7)
  • Connect Pin 4 of the temperature gauge to ground (Pin 6)


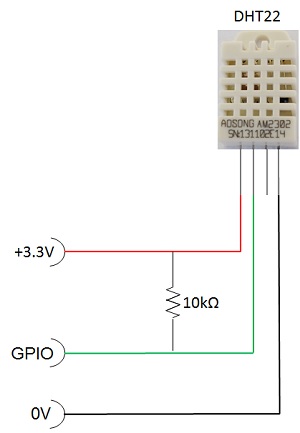
Figure 1. DHT22 temperature and humidity digital sensor circuit diagram


Figure 2. Picture of circuit from Figure 1 on a bread board


Configure the dashboard 

Step 1: Register an account with PrivateEyePi
 
If you have not yet registered with PrivateEyePi follow the following steps, otherwise proceed to Step 3. 
  • Go to www.privateeyepi.com
  • Click on "New User" option top right of the screen.
  • Enter your the details on the screen and click update.
 
Step 2: Install PrivateEyePi software on your Raspberry Pi

Follow the following link to install the PrivateEyePi software:


At the command prompt: pi@raspberrypi / $

Type

  cd /home/pi/pep
  sudo apt-get update
  sudo apt-get install git
   sudo git clone https://github.com/adafruit/Adafruit_Python_DHT.git 
  cd Adafruit_Python_DHT
  sudo apt-get install build-essential python-dev  
  sudo python setup.py install 

Step 3: Register token
  • Follow the following link to enter your token in the globals.py file

  sudo nano globals.py

Set the PrintToScreen setting to "True". This will print all output to the screen while you are testing your setup. You can switch this off later once everything is working.

Set the Farenheit variable to True if you want your temperature display in Fahrenheit on your dashboard. As per bottom of Figure 3 update the dht22_gpio and dht22_pin_no settings with the GPIO number and it's associated Raspberry Pi pin number (they are not the same!) to which your sensor is connected. In this tutorial it is GPIO 4 (or pin 7 on the Raspberry Pi).

   Figure 3 - Set Fahrenheit option and DHT22 GPIO & Pin Number

Press CTRL-X
Then press Y to save the file
Press ENTER
 
Step 4: Run dht22.py program
 
At the command prompt type:

  sudo python dht22.py
 
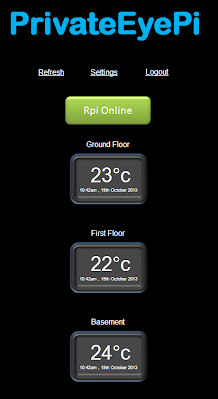
Step 5: View your dashboard
 
  • Go to www.privateeyepi.com
  • Log in, or click on the "Dashboard" link on top left.
  • You should now see the temperature and humidity displayed.
  • You can change the description of each using the Location menu option.
  • The humidity sensor number will have a "3" appended to it (e.g. if you used GPIO 4 then the humidity sensor number will be 34). You can configure that using the HUMPrefix setting in globals.py. The reason for this is to give the humidty its own unique number in PrivateEyePi.
  • If you want the temperature and humidity to be graphed then select the 'Display graph on dashboard' option using the Config menu.
  • If you want the humidity to display with a '%' (e.g. 65.3%) you can enter a '%' in the Prefix field using the Location, Edit menu options. 


https://www.jemrf.com/collections/wifi-enabled-devices/products/wifi-temperature-and-humidity-sensor-internet-of-things-iot


https://www.jemrf.com/collections/accessories/products/dht22-temperature-and-humidity-sensor