|
In this this tutorial I will show you how to enter your token on your Raspberry Pi so that your PrivateEyePi software on your Raspberry Pi can connect with the PrivateEyePi server.
pi@raspberrypi ~ $
You will be making basic edits to the globals.py file. You can use any editor you wish, but in this tutorial we have used an editor called nano. We have assumed you have installed PrivateEyePi already in the /home/pi/pep directory. If you chose a different directory during the installation then replace /home/pi/pep with your directory.
Type the following commands:
cd /home/pi/pep
nano globals.py
Near the top of the file you will see:
token= ""
Edit this line with the token from the User menu option on the website. Cut and paste the token so that you avoid typos.
 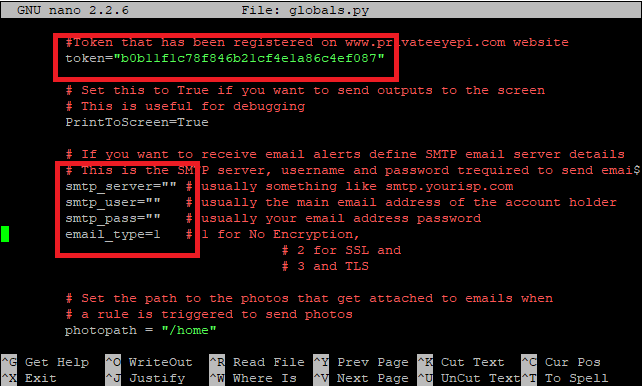
Figure 1 - Enter your token and email account details for sending email alerts
smtp_server="" # usually something like smtp.yourisp.com
smtp_user="" # usually the main email address of the account holder smtp_pass="" # usually your email address password If you don't have these then you will need to get them from your internet service provider. The user and password are normally your email address and a password. The smtp_server is the server used by your internet service provider. For example the GMAIL smtp server name is :
smtp.gmail.com
NOTE: These details are only stored on your Raspberry Pi and not transmitted to our server or over the internet. You should always keep these details in a secure and private location because they provide access to your email account.
If your email service provider uses encryption then there is another small modification required. There are two types of email encryption used for email known as TLS or SSL. You can set the encryption type by changing the email_type setting to 2 or 3 (1 for no encryption):
email_type=2 # 1 for No Encryption,
# 2 for SSL and
# 3 and TLS
If you don't know the type of encryption your internet service provider uses then test it using trial and error (e.g. 1, 2 and 3 until it works).
To save the file press alt-x and then 'y' and then press ENTER
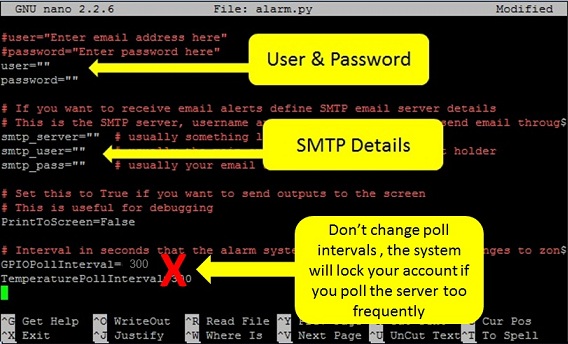
Now run the application by typing python and then the application name, e.g:
python alarm.py
If you receive an error message, or are having trouble, retrace your steps and re-check everything. Also go to the following page for troubleshooting ideas:
|
|
|
|
|
|