|
In this tutorial you will learn how to connect the Flex Radio Module to an Arduino and establish radio communications between the Arduino and the Flex Radio and other RF devices.
The Arduino is a very popular micro-controller board used for electronic projects and prototyping. This tutorial will get you started down the path to giving your electronic projects wireless capability.
Wiring
Figure 1 below shows the pin numbers of the Flex Module and Figure 2 shows the wiring between the Flex RF module and the Arduino. Use the table information below to make the 4 connections.
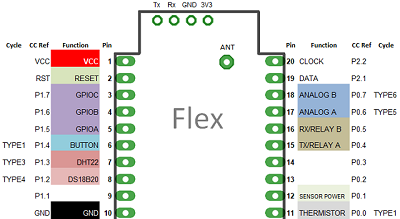 Figure 1 - Flex Pinout 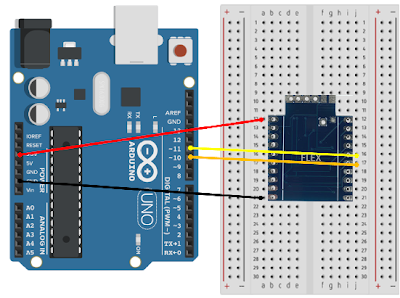 Figure 2 - Flex RF Module to Arduino Wiring Diagram Software
The software below allows you to monitor incoming radio messages and also send messages over the air using the Arduino Serial Monitor. In this tutorial we are using the Aruino Uno which only have one serial port. The serial port is needed by the Arduino Serial monitor therefore we use the Arduino SoftwareSerial library to create another serial port for the Flex RF Module.
Start a new Arduino project and paste in the code below.
SoftwareSerial should come built in with your Arduino installation. You can check this by going to menu items Sketch, Include Library, Manage Libraries and then search for and install SoftwareSerial. If not installed then choose to install it.
Once the you have compiled and loaded the sketch onto the Arduino you can open up the Serial Monitor using the magnify glass icon top right of the Arduino editor and select baud rate of 57,600.
Do the following tests:
1. Check communications between Arduino and Flex RF Module (assuming your device ID is 03)
Type a03HELLO into the input text box and press send. You should see a a03HELLO---- response.
2. Check RF communications
Either trigger another RF sensor node or send a message from another RF device to this device. You can watch the video below where we send messages between an Arduino/Flex and RaspberryPi/RPI RF Base Station.
Final Notes
- Use the code below to build your own RF applications. As you can see sending an RF message takes only one line of code!
mySerial.println("a03HELLO");
- Start your messages with 'a' as the leading character which is used by the receiver to denote the start of a message - All messages should be 12 or less characters, including the 'a' - If you need to send messages longer than 11 characters split them up into multiple messages (called packets) and reconstruct them on the receiver side /* Software serial bridge between Arduino Serial Port and Software Serial Port Receives from the hardware serial, sends to software serial. Receives from software serial, sends to hardware serial. The circuit: RX is digital pin 10 (connect to TX of other device) TX is digital pin 11 (connect to RX of other device) Note: Not all pins on the Mega and Mega 2560 support change interrupts, so only the following can be used for RX: 10, 11, 12, 13, 50, 51, 52, 53, 62, 63, 64, 65, 66, 67, 68, 69 Not all pins on the Leonardo and Micro support change interrupts, so only the following can be used for RX: 8, 9, 10, 11, 14 (MISO), 15 (SCK), 16 (MOSI). created back in the mists of time modified 25 May 2012 by Tom Igoe based on Mikal Hart's example Modified in 2017 by J Evans for Flex radio module This example code is in the public domain.*/#include <SoftwareSerial.h>SoftwareSerial mySerial(10, 11); // RX, TXvoid setup() { // Open serial communications and wait for port to open: Serial.begin(57600); while (!Serial) { ; // wait for serial port to connect. Needed for native USB port only } // set the data rate for the SoftwareSerial port mySerial.begin(9600); mySerial.println("a03HELLO");}void loop() { // run over and over String RFData = ""; String SerialData = ""; while (mySerial.available()) { delay(10); //Allows full message to arrive before we quit the loop RFData+=char(mySerial.read()); } if (RFData != "") { Serial.println(RFData); RFData = ""; } while (Serial.available()) { delay(10); //Allows full message to arrive before we quit the loop SerialData += char(Serial.read()); } if (SerialData != "") { mySerial.print(SerialData); SerialData = ""; }} |
Home > Home Alarm System project > Wireless Projects > Wireless Sensor - FLEX RF Module > Flex Tutorials >