|
Other guides:
Configuration guide for:
This guide shows you how to set up the WIFI Remote Control Switch so you can switch things on and off from your WWW PrivateEyePi dashboard. You can also use the PrivateEyePi rules engine to switch things on off based on rules (e.g. door open then turn on light). Alternatively integrate the device with another software solution or your own as explained in our interface guide.
Connecting a relay switch to the WIFI controller.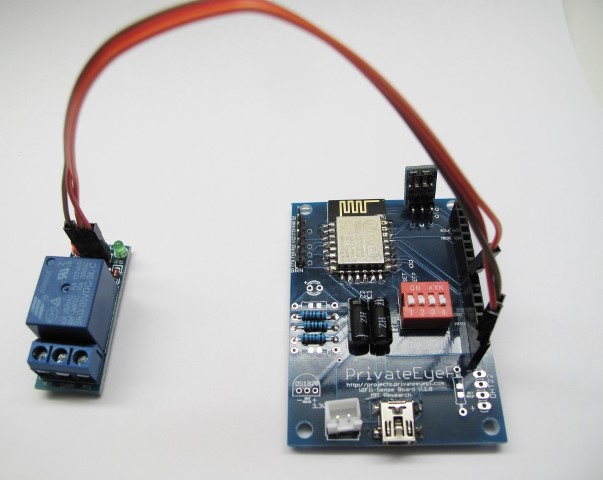
WARNING : Mains electricity can kill if you are careless or lacking in knowledge of how to connect high voltage.
The WIFI Relay is capable of switching up to 8 relays. Each relay is connected to the WIFI controller via three wires as shown in figure 1.
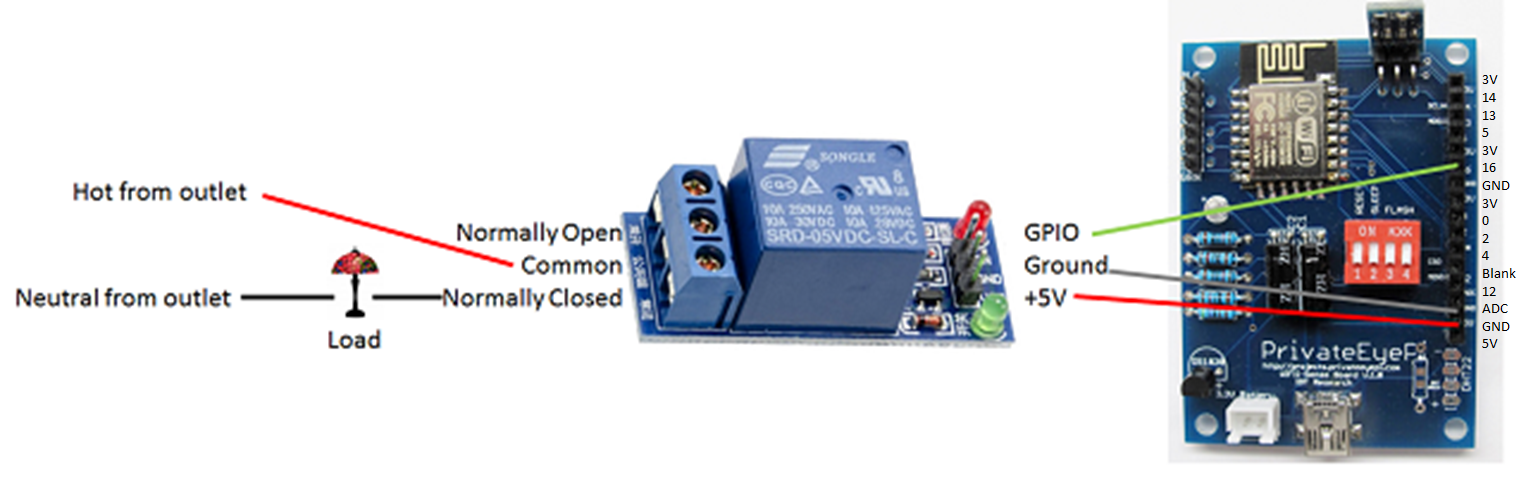 Figure 1 - Wiring diagram to connect a relay switch to the WIFI controller
In figure 1 the GPIO is connected to any one of the following GPIO ports: 0,2,4,5,12,13,14,16. Take note that if you are adding a relay to a WIFI controller that has a temperature sensor installed then you should not use the following GPIO ports: 4, 12(DHT22), and 13(DS18B20) as it will interfere with the temperature sensing and the relay may switch intermittently as the device tries to collect temperature readings.
The sixteen pin header on the right hand side of the WIFI controller only has one 5V outlet, so when connecting multiple relay switches you need to create a common wire to connect all the relay switch +5V wires. A good way to do this is strip off some of the insulation of a jumper wire and then solder all the +5V relay wires to the exposed wire. Another way to do it is to use a breadboard. You need to do the same for GND, however there are two GND outlets.
Configuring the WIFI controller.
Before you start this configuration ensure you have already followed the getting started guide that shows you how to connect your device to your WIFI router and to the PrivateEyePi server (optional).
Open up the WIFI configuration screen by browsing to your WIFI devices IP address in a browser and then click on the Sensor Config menu. If you want to be able to control the device using your PrivateEyePi dashboard then click on the "Allow external control" check box as shown below.
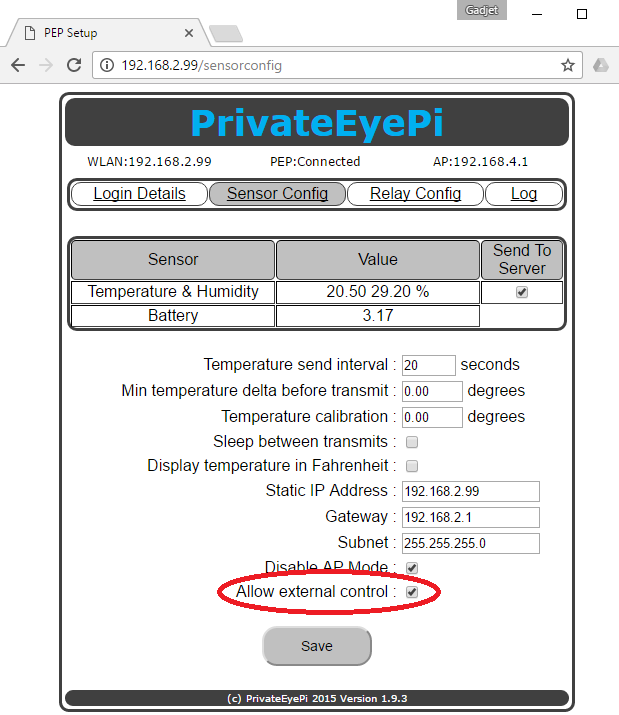 All the other settings in the above image may vary to yours depending on the type of sensor you have and what settings you configured earlier in the Getting Started Guide.
Security Note:
The "Allow external control" option will allow you to switch things on/off from the WWW outside your home network. Communications to the outside world are encrypted, but it is important to keep your Token (from the Login Details Screen) secret. Anyone with your token will be able to control the GPIO ports of your WIFI controller. If you suspect your token has been compromised then you can deny access to the device by de-selecting the "Allow external control". You should also generate a new token on the PrivateEyePi website (User menu) which will destroy your old token.
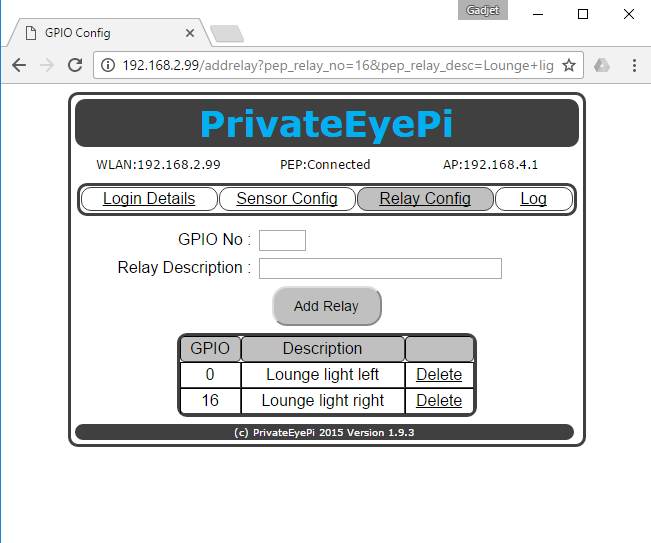
Next you need to configure the GPIO ports on you WIFI controller for use with a relay switch. Click on Relay Config menu option and enter the GPIO number and a description as shown below:
 Now navigate to www.privateeyepi.com, login and click on the Control menu item at the top of your dashboard. You will now see the two relay switches you configured earlier show as switches, as shown below:
 You can now switch the relays by clicking on the on/off buttons.
If you do not want to use the PrivateEyePi dashboard then you can switch the relay using the following URL to your device:
This will switch GPIO 0 off:
http://192.168.2.99/relayoff?id=0
This will switch GPIO 0 on:
http://192.168.2.99/relayon?id=0
However this will only work if you are on your local home network. You will not be able to do this from the WWW.
Troubleshooting tips
What do I do if the control dashboard says "Connecting"?
This is usually caused by an incorrect PrivateEyePi token configured on the WIFI controller. Copy and paste the token from the www.privateeyepi.com User Menu to the Login Details menu on the WIFI controller. Your configuration screen must say "PEP: Connected" at the top.
|
|
|
|
|
|