|
Note: There is a newer tutorial that replaces this one that supports multiple temperature sensors.
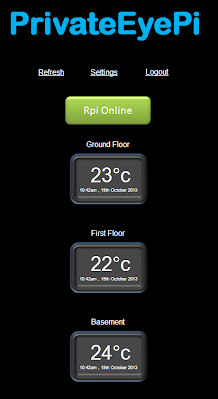
At the end of the project you will have a WWW dashboard that looks similar to this:
What you need:
For support, queries or suggestions please email support@privateeyepi.com or leave comments in our blog.
Step 1: Build and test the Electronics:
Parts can be purchased from our store: JemRF store
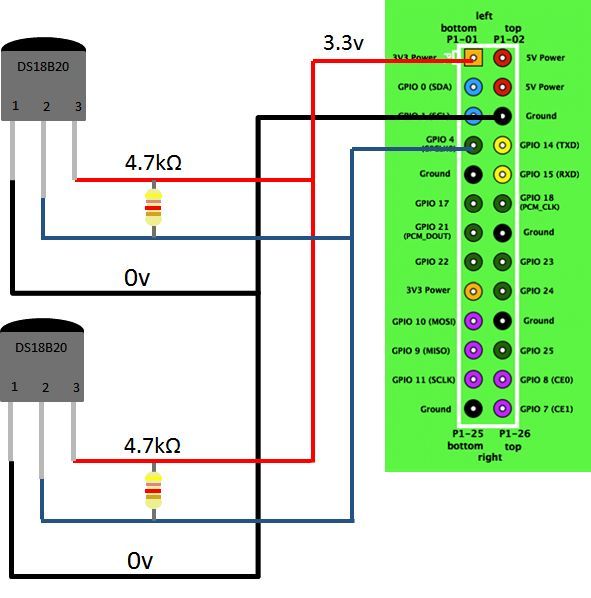
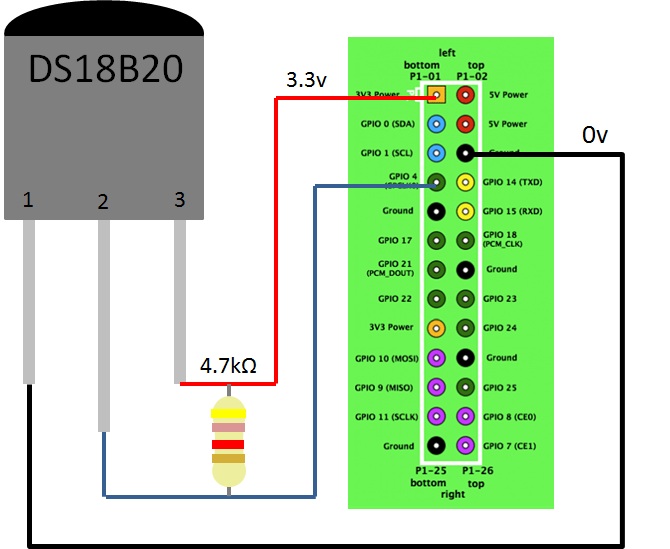
Figure 1. DS18B20 temperature sensor circuit diagram
If you want to add multiple sensors daisy chain the middle pin of the sensors. This will work because every DS18B20 sensor has a unique ID that is used to differentiate the signals coming from the sensors See Figure 2 below.
Once built, follow the following steps to test that it is working:
Log in to your Raspberry Pi
sudo modprobe w1-gpio
sudo modprobe w1-therm cd /sys/bus/w1/devices/ ls
You will see a listing of the current directory. There should be a directory that is the serial number of your temperature gauge. The serial number of my thermometer 28-0000040be5b6, but every one will be unique. Make a note of yours as you will need it later in step 4. If you have multiple sensors there will be multiple directories listed.
If you don't see a directory with lots of numbers and letters like the one above then:
If you do see the directory then type cd followed by the directory name:
cd 28-0000040be5b6
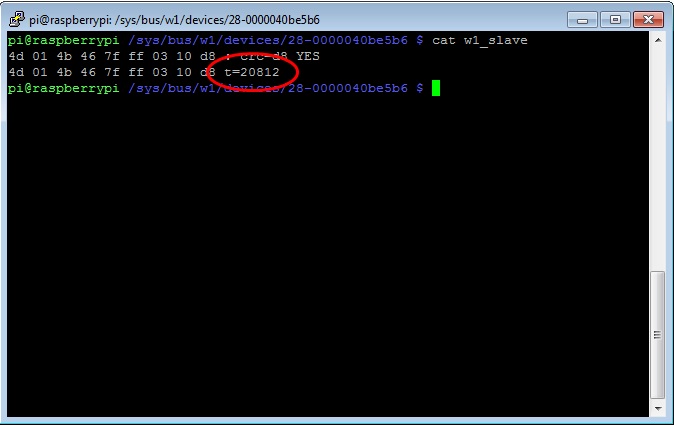
cat w1_slave
You will now see a dump of the w1_slave file that contains the temperature data in celcius (refer Figure 3). 20812 is 20.812 degrees celcius. The dashboard does support a Fahrenheit setting that we will cover later if that is your preference.
Figure 3. The contents of w1_slave file that contains the temperature for the DS18B20 sensor
Step 2: Register user and password
If you have not yet registered a user and password with PrivateEyePi follow the following steps, otherwise proceed to Step 3. Note this is a completely free service and has no trial period.
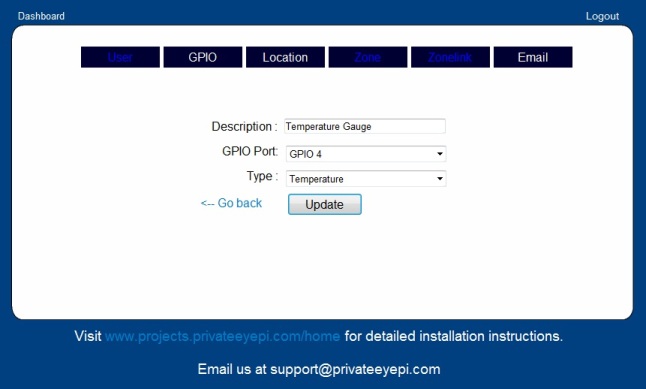
Step 3: Configure GPIO 4
This configuration tells the system that you have connected a temperature gauge to GPIO 4 and to display it on your dashboard.
Figure 4. PrivateEyePi setting for a new sensor
Figure 5. PrivateEyePi location settings
If you have multiple sensors then repeat this step and add other GPIO and Locations settings for each sensor. In Figure 6 I have configured three sensors, one for basement, ground floor and first floor. At least one must have a Number of 7, and the others can have any number you choose. Choose a number that does not conflict with any of the GPIO number of the Raspberry Pi. I have used 88 and 89. In step 4 you will use these numbers to associate the sensors on the Raspberry Pi with the temperature gauges on the dashboard.
 Figure 6. Multiple temperature gauge settings
Step 4: Install/Upgrade your PrivateEyePi software
Follow the following link to the tutorial -> Install PrivateEyePi Software
Step 4: Configure the program
cd /home
sudo nano globals.py
Page down until you see the DallasSensorNumber settings (as per Figure 8). You need to place the GPIO number that you configured in step 3 (Figure 5) in between the brackets (e.g. DallasSensorNumber(7) ), replacing the numbers you see in the file with your own numbers. If you have multiple sensors then repeat the line with the other GPIO numbers (as per Figure 8). Then do the same for the directory name replacing the directory names you see with your directory names that you made a note of in step 1.
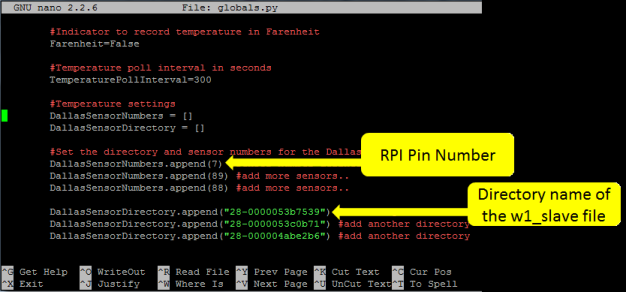
If you want your temperature to be display in Fahrenheit instead of Celsius then find the line that says Farenheit=False and change it to Farenheit=True (refer the top two lines of Figure 8).
Press CTRL-X
Then press Y to save the file
Press ENTER
Step 5: Run dallas.py program
pi@raspberrypi / $
Type
cd /home
sudo python dallas.py
If you are getting errors or problems see here for diagnostic steps.
Step 6: View your dashboard
 |
   |
Home >
