|
We will be using a third party application called “motion” to operate the webcam. We chose the motion application because: · it is free, · easy to setup, · requires a small amount of CPU processing power (good for a Raspberry Pi), · has video streaming built in, · will create pictures and video files when motion is detected, · will trigger the PrivateEyePi alarm system when motion is detected,
·
is highly configurable.
We did not play any part in creating motion, and full credit goes to it's makers. The motion home page is located here :
So lets get started. First we will create a new directory that
we will work in. At the Raspberry Pi command prompt type:
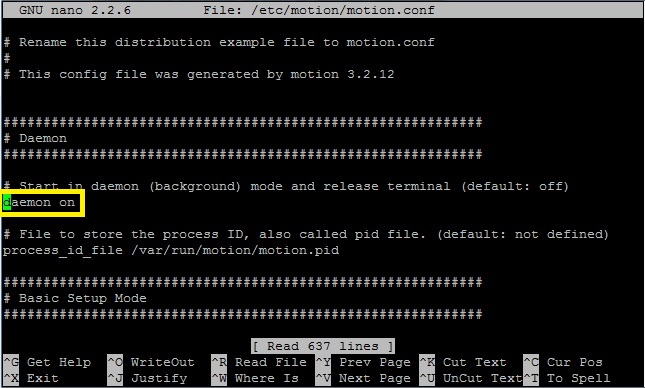
Once this is completed we need to configure motion for our needs. The config file is located in the /etc/motion directory and is called motion.conf. We need to edit this file to make some configuration changes.
Configure motion to run in the background. Set the Daemon configuration on:
Now continue to edit file following settings. If you want to search for a setting use the ctrl-w command, type the setting you want to find and press enter.
To quit from the nano editor press CTRL-X, followed by “Y” and ENTER to save. Now you need to start the motion application. To test that motion is working correctly check that pictures and video are being saved in the /home/webcam directory. You should see a listing of files with .jpg and .avi extensions.
Next we will test that the live webcam server is working. You will need to know the ip address of your Raspberry Pi. How to get your IP address using Linux commands Type the following command:
In the output created look for the Ethernet address. Something like this: wlan0 Link encap:Ethernet HWaddr d8:eb:97:18:16:ef inet addr:192.168.0.19 Bcast:192.168.0.255 Mask:255.255.255.0 In the above example the ipaddress is 192.168.0.19. Next enter the ip address followed by the port number you configured earlier (8085) into a web browser. http://192.168.0.19:8085 Note that Internet Explorer does not support mjpeg steaming, so you will need to use Firefox, Safari, or Chrome. For more advanced users there is a fix for the Internet Explorer shortcoming. You can use a java applet that will stream mjpeg to any java enabled browser (explained further here http://www.lavrsen.dk/foswiki/bin/view/Motion/WebcamServer ). If all went well you should now have a Raspberry Pi surveillance system that is accessible anywhere on your home network.
View the Webcam from the internet In the next section you will learn how to view the surveillance over the internet. Please be sure to read the safety section before attempting this. The next part is more advanced and will enable you to view the live webcam video stream from the internet. The ip address we used earlier in the tutorial (192.168.0.19) is an IP address allocated by your DHCP server in the router. This address is only accessible to devices connected to the router and not by anyone on the internet. If you want to access the live webcam video from the internet then you need to open up the port we assigned to motion, port 8085. To do this requires a configuration to your router. Getting access to your router requires you know how to do this, and may require that you contact your Internet Service Provider (ISP) or Cable Company.
You will need to know the IP address of your router. Many routers use the 192.168.0.1 or 192.168.1.1 address as a default. Type your router ip address into a browser. This will take you to a login page where you need to login into the router with the username and password for the router. I cannot provide you with detailed instructions for this part as there are many different routers each with their own configuration applications. Look for “port range forwarding” or “port forwarding” settings, sometimes under a “Gaming” menu (Gamers need to open port to be able to participate in peer-to-peer games over the internet).
Add a new entry called rpi-web. FromPort=8085, ToPort=8085, IpAddress=(Raspberry Pi IP address from above).
Take note of the internet IP address of the router under the Gateway settings of the router. This is the address that has been assigned to you by your ISP and you will use this address to access from the internet.
Now type http://InternetIPAddress:8085 into a browser connected to the internet. This should take you to your webcam video stream.
Security Considerations
Your webcam is now accessible to anyone the internet who knows your internet address and port number. It would be a good idea to install a firewall on your Raspberry Pi to protect your computer from port scanners and other malicious programs. A firewall is basically a set of rules that limits or blocks incoming or outgoing web requests. One more thing you may want to protect against is internet users attempting to access your SSH account by trying a dictionary attack against your password. There is a handy utility called Fail2Ban that monitors your log files for failed login attempts and temporarily blocks offending users. Detailed instruction on these precautions is beyond the scope of this tutorial.
|
|
|
|
|
|