|
Before following these steps make sure you have already setup and configured the Base Station Receiver.
sudo wget www.privateeyepi.com/downloads/serial_mon.py python serial_mon.py 9600
Note: If you have a wireless switch do not open/close the switch during the first 5 seconds as this will cause the device to start sending messages and cancel the startup sequence and prevent the device from entering sleep mode.
Note: Ideally put the sensors more than 5 feet away from the receiver when testing otherwise you may see message corruption or incomplete messages. These devices are tuned to transmit at a high DB in order to penetrate walls and for long distance line of sight so we have found when a sensor is very close to the receiver (e.g. 1-2 feet) then we see incomplete messages.
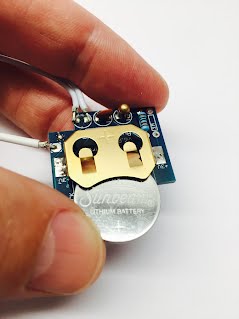
Figure 1 - Insert the battery
Note: The above figure already has a door switch soldered to the button sensors (two white wires between my fingers). This is not necessary at this stage and will be covered later in this tutorial
If you purchased a temperature sensor you will see:
pi@raspberrypi:~/rf_tools $ python serial_mon.py 9600Sat Oct 28 20:57:31 2017 a02STARTED--Sat Oct 28 20:57:31 2017 a02STARTED--Sat Oct 28 20:57:31 2017 a02STARTED--Sat Oct 28 20:57:31 2017 a02STARTED--Sat Oct 28 20:57:31 2017 a02STARTED--Sat Oct 28 20:57:36 2017 a02TMPA22.05Sat Oct 28 20:57:36 2017 a02SLEEPING-Notice that the sensor sent a temperature reading (a02TMPA22.05) before going to sleep. We have configured the sensor to send a reading every 5 minutes. If you wait for 5 minutes then the sensor will awake from sleep and send another temperature reading and then go back to sleep.
If you purchased a switch sensor you will see:
pi@raspberrypi:~/rf_tools $ python serial_mon.py 9600Sat Oct 28 21:05:03 2017 a02STARTED--Sat Oct 28 21:05:03 2017 a02STARTED--Sat Oct 28 21:05:03 2017 a02STARTED--Sat Oct 28 21:05:03 2017 a02STARTED--Sat Oct 28 21:05:03 2017 a02STARTED--Sat Oct 28 21:05:06 2017 a02STATEOFF-Sat Oct 28 21:05:07 2017 a02SLEEPING-Notice the sensor sent the state of the switch (a02STATEOFF-
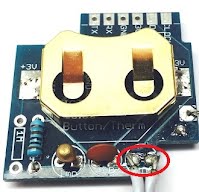
) before going to sleep. Every time the switch changes state (ie: opens or closes) then the sensor awakens from sleep and transmits the new state of the switch. Try testing this by closing and opening the switch or bridging the contacts shown in Figure 2. This will also work if your sensor is configured for Temperature sensing.
Figure 2 - Red circle shows the button switch contacts
Messages transmitted when contacts bridged (switch closed):
Sat Oct 28 21:50:41 2017 a02AWAKE----
Sat Oct 28 21:50:41 2017 a02BUTTONON-
Sat Oct 28 21:50:41 2017 a02BUTTONON-
Sat Oct 28 21:50:41 2017 a02SLEEPING-
Messages transmitted when contacts not bridged (switch open):
Sat Oct 28 21:50:43 2017 a02AWAKE----
Sat Oct 28 21:50:43 2017 a02BUTTONOFF
Sat Oct 28 21:50:43 2017 a02BUTTONOFF
Sat Oct 28 21:50:43 2017 a02SLEEPING-
Note: Notice above that two BUTTONON/OFF messages are sent every time the switch state changes. This is merely precautionary in case one message is missed by the receiver. The number of messages can be configured using the NOMSG command (see sensor manual for more details on that).
If you only plan on using the temperature sensor then you can jump to the next tutorial that shows you how to connect your sensor to the PrivateEyePi website.
|
|
|
|


