Project Description
In this project I will show you how to connect up an HD4470 16x2
character LCD to your Raspberry Pi. There are many of these types of LCD's available on the market so if you have an LCD with 16 pins then it's likely derivative of the HD44780. These LCD's have a back light that can be switched on/ff using 5V to pins 15,16 so make sure that the back light works before starting the project. Most LCD's have an LED back light but there are some on the market with EL back lights which can't be powered by the Raspberry Pi because it draws too much power and will crash your Pi. All our LCD's have been tested with the Raspberry Pi.
Project Difficulty
This project does not require soldering and can be constructed using a bread board and jumper wires.
What you will need
In addition to your Raspberry Pi and associated peripherals you will need:
Construction
This LCD uses a parallel interface so will need many connections to the Raspberry Pi. I have connected an LCD to the Raspberry Pi many times and ALWAYS make at least one mistake. I've never broken an LCD so they seem quite resilient to bad wiring! The potentiometer is a variable resistor. Its resistance changes as you turn the knob which will adjust the contrast of the screen.
Using your jumper wire and breadboard connect the LCD to the Raspberry Pi as shown in Figure 1.
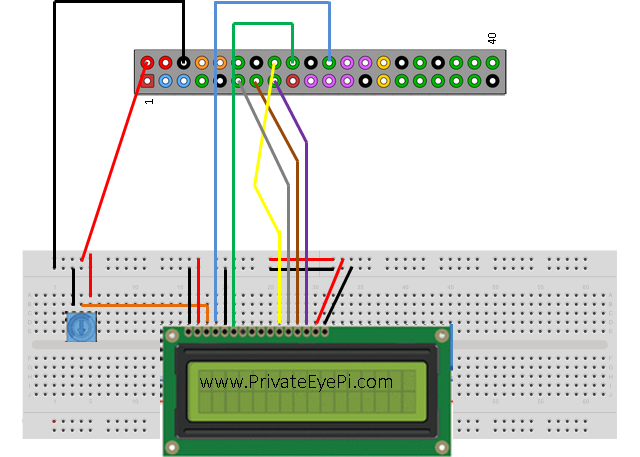 Figure 1 - Breadboard diagram for HD44780 LCD and Raspberry Pi
The top part of Figure 1 is the Raspberry Pi GPIO header for A++,B++ or Rpi 2 models which has 40 pins. If you have one of the older Raspberry Pi A,B the connections are the same, even though you have 26 pins in total not 40. There are many connections so use the following table to check your work:
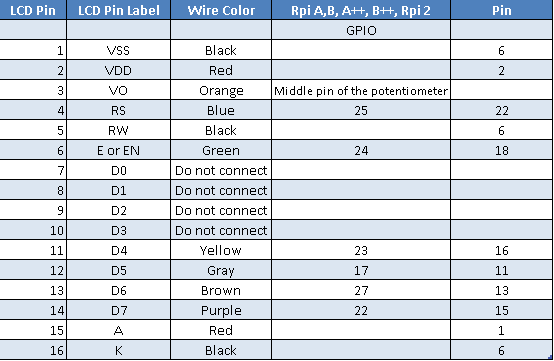 Figure 2 - Connection table for LCD HD44780 to Raspberry Pi
Software
After that grueling build, now for the fun part! We've included an LCD test program with the PrivateEyePi software called lcdtest.py.
Install or upgrade your PrivateEyePi software using this tutorial.Once installed run the test program as follows:
Log in to your Raspberry Pi and type the following command on at the console:
cd /home
python lcdtest.py
You should see Hello World!! on both lines of the LCD panel as shown in Figure 3.
2f01.jpg?attredirects=0)
Figure 3 - LCD test with Raspberry Pi
Edit the lcdtest.py program and change it to display whatever you want.
sudo nano lcdtest.py
You will see the following line that tells the LCD to display Hello World on each line:
DisplayLCD("Hello World!!**Hello World!!")
Notice that the LCD does not print the **. The ** is a carriage return marker that tells the LCD to move to the first position on the next line.
If you want to perform other functions like blinking, scrolling, right to left etc.. have a look in lcd_hd44780.py which we have kindly borrowed and modified from the lrvik github repository.You will need some Python programming knowledge to edit lcd_44780.py, but most beginner programmers should be able to use lcdtest.py for displaying on the LCD.
Now that you have an LCD panel working you can go to the software section. |
Home > Home Alarm System project >